


How To Put Up A Bell Tent
When you're out exploring the outdoors or enjoying a festival, you want a tent that's quick and easy to set up. At Boutique Camping, our bell tents provide you with your own private slice of luxury, with tents as small as small as 3m can be pitched in less than 10 minutes! In this blog, we’ll walk you through a step-by-step of how to put up a bell tent.
Browse our selection of bell tents to see where adventure takes you or get in contact with our team to help pick the perfect tent for you.
Step 1 - Find the Perfect Place to Pitch
Before you begin setting up your tent you need to find the right place to set up and camp. There are a few things you should keep in mind when selecting the right location to pitch your tent.
Firstly, you’ll want to make sure the ground where you’re camping is flat and not on a slope or uneven ground. If you’re on bumpy ground this will make it difficult for you to get comfortable and can also damage your tent from the stain of trying to remain upright with different levels of tension.
An open space that is free from heavy winds and flooding is best for your bell tent. Avoid setting up close to trees, fences and buildings. We know however that space can sometimes be limited when camping for things like festivals, so you can utilise a tent protector to help keep your tent clear of any leaves, rain or other debris.
A top tip before pitching is to lay a groundsheet protector to keep your groundsheet free from mud and water. It can also act as a handy guide when pitching your tent.

Step 2 - Unpack Your Tent
Now you know where to set up it’s time to unpack your tent. Lay your tent out flat on the floor groundsheet down. Unpack all the components in the tent bag and double-check you have everything you need (do this before you leave for camping to be safe too!). Your classic bell tent bag should include
component checklist:
- Tent with attached guy ropes and groundsheet
- Rubber mallet
- Full set of steel pegs
- x1 Centre Pole
- A-Frame Pole (x1-4 depending on the quantity of doors)
- Screw on rain cap
- Instruction manual
- Spares bag
Once you’ve laid out everything you need, take your tent and rotate it to ensure the door is facing wherever you want to enter.
To help visualise the pitching process, we’ve filmed a simple but detailed pitching tutorial for our classic bell tent.
Step 3 - Prepare to Peg
Once your tent is flat and in a circle, find each elastic ring and eyelet on the groundsheet and match them to a smooth peg.
Using your rubber mallet, hammer each peg into the ground at a 60-degree angle. This will allow for your tent to stay firmly fixed to the ground.
Top tip: if you're camping during summer and the ground is hard, pour a little water on the area you’re placing the peg to soften the ground.
Step 4 - Centre Pole
Assemble the centre pole and bring it inside the tent, ensuring that the integrated loop is at the top end of the tent.
Once inside the tent, find the cone at the top and push the pole upwards into the cone. Keep lifting the pole until the tent is lifted and the pole is centred straight, touching both the tent floor and roof.
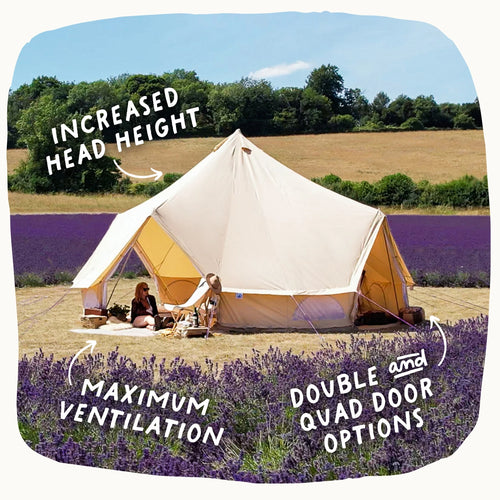
If you need extra space and prefer not to have a pole in the middle of your tent, we offer a bell tent tripod pole. This three-legged pole acts as an alternative to the centre pole and utilises space whilst providing additional support for your tent. If you’ve got a 3,4 or 5m classic bell tent or bell tent plus then this is a great option for extra room and structural support.
Step 5 - A-Frames, Assemble!
From inside the tent, fix the sections of the a-frame together and remove the screw rain cap from the top of the frame (keep it on hand as you’ll need it again!).
Remaining inside the tent, push the spike of the frame through the hole in the tent roof. Position the pole so it runs along the seams of the tent doorway and place the bottom of the frame into the pockets inside the tent. Secure the pole in place using the ties provided.
Once the pole is secure, use that handy rain cap you put to one side and attach it to the spike protruding from the outside of the tent. This will make sure you stay nice and dry.
If you’ve got a multidoor bell tent, repeat this step for each door.

Step 6 - Guy Ropes
It’s time to secure your guy ropes. Start by sipping your tent door closed and locate the longest guy rope just above the tent doorway. All guy ropes are pre-attached to the tent so you should be able to easily locate them.
Secure the extra long guy rope using the rebar pegs provided. These pegs have grooves whilst the groundsheet pegs are smooth. Make sure your guy rope is at the right angle and in line with the door zip.
Step 7 - More Guy Ropes!
Continue to secure each guy rope in the ground using the rubber mallet and grooved pegs. You’ll need to make sure each rope is pegged in line with the seams of the tent wall and secure the ripes at least 1 meter from the tent.
Use the guy rope adjusters to adjust the tension so that it is equal on every side. This will ensure your tent is expanded fully for the correct space and structural security. If you peg your guy ropes too close to your tent it can cave in and have a deflated look.
Again, we know that space can be limited at some campsites, so we’ve created special space-saver reducer poles that allow your tent to be pitched properly in areas where the 1-meter rule just can’t be followed.
Step 8 - The Final Touches!
Your tent should now be fully pitched, congratulations! The final step is to perform regular checks on your tent. Ensure your tent is well-ventilated when not in use by opening windows and doors as well as detaching the zipper groundsheets.
When you’re not enjoying time with friends and family or dancing the night away, do a quick check on the pegs to ensure they’re still firmly in the ground and also inspect your tent for any stains or dirt. Remember that the quicker you deal with splashes and mud the better it is for the health of your tent.

Pitch perfect every time with Boutique Camping
Our tents are designed to assemble quickly and easily, but if you’re ever in need of more advice and guidance our experts at Boutique Camping are on hand to help. When you get in touch with us, you’ll be assisted by experienced campers who can help you resolve any issues and answer queries fast.
Make your camping memories even more special with a bell tent from Boutique Camping!


Leave a comment