OUTDOORS OR IN-TENT? YOUR GUIDE TO IGNITING YOUR STOVE'S FLAME 🔥
Welcome to our comprehensive guide on lighting and using a stove inside OR outside of your tent! Whether you're a seasoned camper or a first-time adventurer seeking a cosy camping experience, understanding the process of installing and lighting a stove properly can greatly enhance your camping trip. In this blog, we'll walk you through step-by-step instructions on safely setting up your stove, choosing the right wood for efficient burning, maintaining a steady flame, and implementing essential safety tips to ensure a worry-free camping experience.
Let's dive in and unlock the secrets to a warm and delightful camping experience with your trusty wood-burning stove!
IGNITING THE FLAME
🪵 Best Materials to Use 🪵
When it comes to using a wood-burning stove, the choice of materials is crucial for efficiency, safety, and environmental impact. Here are the best materials to use in a wood-burning stove:
Dry, Seasoned Hardwood: Dry and properly seasoned hardwood is the best fuel for a wood-burning stove. Hardwoods such as oak, maple, birch, ash, and beech are dense and provide a high heat output with minimal smoke and creosote production. Seasoned wood has a lower moisture content, which means it burns more efficiently, produces more heat, and reduces the risk of creosote buildup in the stove and chimney.
Eco-friendly Logs: Look for logs that are certified as eco-friendly, sustainable, and sourced from responsibly managed forests. Using sustainable wood helps minimise the environmental impact of wood burning.
Avoid Softwoods: Avoid using softwoods such as pine, spruce, and fir in wood-burning stoves. Softwoods contain higher amounts of resin and sap, which can lead to increased creosote buildup and the potential for chimney fires.
Kindling and Fire Starters: Use dry kindling and Eco Fire Starters or newspaper, to ignite the fire in your stove effectively.
Ashes (for Cleaning): The ashes from your wood-burning stove can be used as a natural cleaning agent for various purposes, or adding nutrients to your garden soil.
1. Stove Preparation
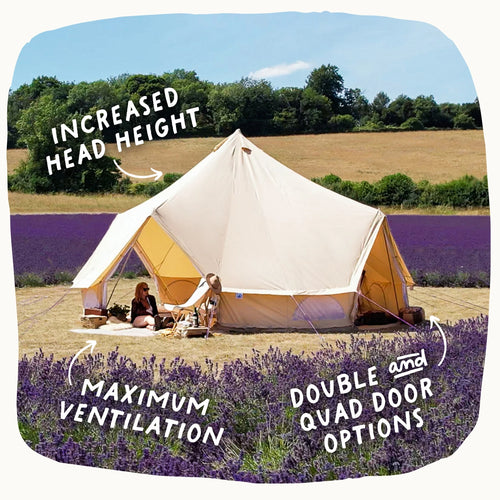
Make sure the stove is sat on a stand or heat mat, a minimum of 60cm away from the tent fabric (or any other flammable belongings). If your stove has legs, ensure they are fully erected and if applicable locked into place.
The damper controls the airflow into the stove, and it's crucial to fully open it when starting a fire for efficient combustion. Once the fire is established, you can adjust the damper to control the heat output and airflow. Opening the damper wider increases heat, while closing it slightly reduces heat. Some stoves may have a second damper in the flue or chimney pipe, which should also be opened when lighting the fire.
2. Wood Positioning
Begin by positioning your fire close to the front door of the stove, leaving the back half empty. For starting the fire, you only need a small amount of fuel, like three small logs, kindling, and effective natural flamers.
3. Starting the Fire
After igniting the match and starting a small fire, ensure the flue damper is in the 'open' position (handle parallel to the vertical flue direction). Leave the stove door slightly ajar, allowing air to create a gentle jet that feeds the fire and combusts gases in the back of the stove. As the gases escape up the heated flue, it increases the draught, pulling more air through the gap between the door and the stove, resulting in enhanced airflow over the burning fire and up through the flue.
4. Maintaining the Flame
Once the flue is hot and the process is established, you can moderate the air intake by reducing the door slot/gap size. However, avoid completely closing the door, as this will starve the fire of air. Once the fire is established, adjust the flue damper to reduce draw and keep more heat inside the stove. A 45-degree angle is a good starting point for the damper position.
Your fire should then burn efficiently, and you can add fuel as needed, like an eco fuel log every 30 - 40 minutes. With more experience using the stove, you'll find it easier to balance the fuel, air intake, and heat output for optimal performance.
For optimal wood burning, create a bed of ash at the bottom of the stove and allow air to enter from the top. Place the logs in the base of the stove, with a small amount of ash to support the fire's growth.
Avoid fully closing the door, as it starves the fire and leads to excessive smoke. Similarly, don't leave the door wide open when starting the fire, as it will dissipate accumulated heat and delay reaching the stove's efficient temperature.
HOT TENTING
⛺️ What is hot tenting? ⛺️
Hot tenting, also known as winter camping with a heated tent, involves using a tent with a stove installation to stay warm in cold weather and generally invite a warm and light ambiance. Unlike traditional camping, where campers rely solely on sleeping bags and clothing for warmth, hot tenting provides a comfortable and cozy interior environment by using a stove that burns wood, coal, or a similar fuel source. This type of camping is largely favoured by winter enthusiasts, backcountry skiers, and snowshoers who want to camp comfortably in colder climates and extend their outdoor adventures throughout the year, but today you'll find camping novices also partaking in this home-from-home tent setup.
🔥 Can I light a stove in any tent? 🔥
No, it is not safe to light a stove inside just any tent. Using a stove in a tent requires specific safety considerations and the right type of tent fabric for such purposes. Oxford, or polyester camping tents are not designed to accommodate stoves as the fabric is synthetic and not breathable, using a stove in an unsuitable tent can lead to serious safety hazards, including carbon monoxide poisoning, fire, and damage to the tent fabric.
The breathable fabrics at Boutique Camping that can safely accommodate a stove are; Polycotton canvas, Cotton, and of course of Fire Retardant Cotton which has been treated with solution for increased proofing.
When using a stove inside a hot tent, it's essential to follow all safety guidelines provided by the tent manufacturer. Proper ventilation is crucial to prevent the buildup of carbon monoxide inside the tent. Always ensure the stove is stable and placed on a non-flammable surface, and avoid leaving the stove unattended while it's burning.
🧐 Choosing the right wood-fire stove for hot tenting? 🧐 When shopping for a wood-burning stove, consider which factors are most important to you... an efficient light source? a crowd warming heat? or/and creative cooking capabilities?
There are many other considerations when choosing your stove:
- Weight... will you be transporting your stove?
- Size... is your tent space big enough to accommodate your stove or do your bed, furniture and belongings take up most of the space?
- Light... do you already have lighting in your tent or will a stove with maximum glass windows be best?
Explore, compare and find out about each of our stoves, fire pits and pizza oven individual attributes here.
🔧 How do I install a stove in my tent? 🔧
A little patience, labour, household tools and most importantly, a flashing kit.
This is a set of components used to create a weatherproof seal around a chimney or vent pipe where it penetrates through the tent's roof or wall. The purpose of a flashing kit is to prevent water leaks and potential damage to the tent.
Our Flashing Kits comes with two metal rings, nuts and washers, and a silicone bung for when the stove is not in use. Chimney widths can vary, so make sure you measure yours before choosing the flashing kit to install it with!
If you're tent already has a hole stitched into the tent walls, you will still need to attach a flashing kit, please see this video here to see how.
Whether you use your stove for heating or cooking, if in regular use your wood-burning stove may be in desperate need of some TLC. Here are some tips to getting your stove in tip top condition once again and ensure maximum longevity with general maintenance tips...
1. Monitor heat 🌡
If your using your stove in a tent with a flashing kit, we highly advise monitoring the heat using the temperature gauge (Can be purchased separately here) and ensuring the heat of your stove to exceed 250°c, temperatures higher than this may cause damage to the gasket, and subsequently, your tent.
2. Inspect the stove gaskets 🔍
The stove gasket acts as a seal, situated around the inner edges of the stove door. Regularly check for any signs of wear or damage to prevent air leaks, which can lower the stove's efficiency and pose potential hazards.
3. Keep your stove dry ☔️
Stoves are usually made from steel, which if exposed to elements such as rain and humidity can cause the metal to tarnish or rust. We sell bags and stove covers to prevent this damage from happening and ensure when not in use, they are sheltered and dry.
4. Clean regularly 🧼
After each use, ensure you clean the stove thoroughly, removing any remaining ash, soot, and debris from the firebox. If you have a pizza oven, be sure to give the cordierite stone a clean with washing up liquid and warm water. Also, remember to inspect the flue for blockages, as creosote can accumulate quickly. Regularly clean the flue using an appropriate-sized wire chimney brush.
5. Storing your stove 🏚
When the stove is not in use, store it in a dry and cool location and preferably in a stove bag or under a cover, safeguarding it from moisture and humidity. All of our stove designs allow for the flue (chimney) to be broken down and placed in the body of the stove.


Leave a comment